
Technical Documentation
Version
1.1 � May 2025
REST API
API Usage
Our API is
based on a REST service and uses standard HTTP response codes to indicate
errors that occur when making API requests.
Our responses are served in JSON format, including
responses containing error messages.
An example of
a successful example is as follows:

An error
response will have a similar structure:

For the API
to accept the requests you make, they must be properly authenticated.
In the following section we explain how to authenticate the requests to our
API.
Such responses may not always have the same structure
due to progressive changes that may include new fields within the API response.
It is therefore recommended not to strictly validate the entire response.
API error codes
The codes that can be received from the endpoints will
be the following:
|
Code |
Message |
Explanation |
|
200 |
OK |
Everything worked as expected |
|
400 |
Bad Request |
The request was
unacceptable, often due to missing a required parameter |
|
401 |
Unauthorized |
No
valid API key provided |
|
402 |
Failed |
The requested
resource doesn't exist |
|
403 |
Unauthenticated |
Api
key or signature are incorrect or they are not being sent as they should |
|
404 |
Not Found |
The parameters
were valid but the request failed |
|
409 |
Conflict |
The
request conflicts with another request |
|
429 |
Too Many Requests |
Too many requests
hit the API too quickly |
|
500 |
Server Errors |
Something
went wrong on services end |
|
502 |
Server Errors |
Something went
wrong on services end |
|
503 |
Server Errors |
Something
went wrong on services end |
|
504 |
Server Errors |
Something went
wrong on services end |
Concepts
Environments
We have two different environments to make requests
to: Sandbox and Production. Each of these
environments must be called with different data, i.e. the API KEY,
the service, order or card identifiers will be different
depending on the environment in which the call is made.
The Sandbox environment
is an environment created for system testing. This environment is usually used
for gateway integration, and all operations performed in this environment are
done through the test services, so payments made through this
environment do not handle real money.
In this
environment, specific test cards must be used, in order to control the
different responses that can be received (SUCCESS, ERROR...).
The URL of this environment is: https://api.paylands.com/v1/sandbox/
The Production environment
is the final environment of the system. All payments made in this environment
are handled with real money. Therefore, since transactions in this environment
already contact the issuing bank of the cards used, they must be real cards.
The URL of this environment is: https://api.paylands.com/v1/
Operational
The
operations indicate the types of payments that can be made through the
platform.
The type of operative is specified by
the operative attribute in the order
creation call to /payment. Once the order operation
has been configured, the request must be sent to the corresponding endpoint to
perform the subsequent actions.
Authorization
Collection
order effective at the time of the transaction.
|
Code |
Description |
|
AUTHORIZATION |
Performs a payment on the created order. The URL is /payment/direct |
|
REFUND |
Performs a total
or partial refund of a payment. The URL is /payment/refund |
Deferred
Allows a
charge to be sent for later confirmation. It does not perform any check or
debit.
|
Code |
Description |
|
CONFIRMATION |
Enforces
the previously held charge. The URL is /payment/confirmation |
|
CANCELLATION |
Releases the
previously held amount (if not yet confirmed). The URL
is /payment/cancellation |
|
REFUND |
Performs a full or partial refund after a confirmation of a hold. The URL is /payment/refund |
Order status
During the
payment process, orders change status to reflect information about the payment,
that information is in the status field of
the order object.
The Order status can have the following values:
|
Value |
Description |
|
BLACKLISTED |
Operation
rejected by the black list |
|
CANCELLED |
Preauthorization cancelled by client |
|
CREATED |
Payment Order Initiated |
|
EXPIRED |
Transaction that
has been too long on card hold |
|
FRAUD |
Transaction
rejected by the anti-fraud system |
|
PARTIALLY_REFUNDED |
Partially refunded transaction |
|
PARTIALLY_CONFIRMED |
Preauthorization partially confirmed |
|
PENDING_CONFIRMATION |
Preauthorization
that has placed a hold on the user's account and is waiting for the customer
to confirm the hold |
|
REFUNDED |
The
transaction has been returned |
|
SUCCESS |
Successfully completed transaction |
|
REFUSED |
Transaction rejected by bank |
|
PENDING_PROCESSOR_RESPONSE |
Transaction
without 3DS that has been sent to the processor |
|
PENDING_3DS_RESPONSE |
User is on 3DS |
|
PENDING_CARD |
User is on the
payment card inserting his card |
|
USER_CANCELLED |
The
user has canceled the payment from the payment card |
|
REDIRECTED_TO_3DS |
Payment has been
attempted but for security reasons the user must manually authorize the
payment. |
|
AUTHENTICATION_REQUIRED |
The
bank has required authentication for this transaction and is waiting for the
user to access the 3DS |
|
PENDING_PAYMENT |
The user has
provided all the necessary data to carry out the payment and is awaiting
confirmation from the payment provider. |
|
THREEDS_EXPIRED |
The
transaction has arrived on 3DS but the user has abandoned the process, and
has not been authenticated |
Transaction status
Like orders,
transactions also reflect transaction status information in
the status field of the transaction object.
These are the values you can find in a Transaction:
|
Value |
Description |
|
CREATED |
When
we have not yet received a response from the acquirer with the final result
of the transaction. |
|
SUCCESS |
The transaction
has arrived at the processor and has been successfully completed. |
|
REFUSED |
The
transaction has arrived at the processor but has been completed incorrectly
(incorrect card, insufficient funds, etc.). |
|
ERROR |
The transaction
could not be completed due to an error in the service configuration. |
|
PENDING |
When
the transaction is pending to be validated by the processor |
|
CANCELLED |
When the
transaction has been rejected by the processor. |
Authentication
When using
the API you will need to authenticate your API calls with your API Key in every
request. Your API Key implies many privileges, so make sure to keep it secret.
Do not share your API Key nor expose it to the client or within a public
website.
API
authentication is based on HTTP Basic Auth. API Key must be sent as the value
for the username field. It is not necessary to send any value for the password
field. If this header is set manually, API Key must be base64 encoded.
In case you
need to authenticate using bearer auth (as a cross-origin request, for
example), include the modifier -H "Authorization: Bearer "
instead of -u:.
All API calls
must be performed under HTTPS. HTTP requests and unauthenticated calls will be
denied.
You can find
your merchant API Key in the POP
Backoffice.
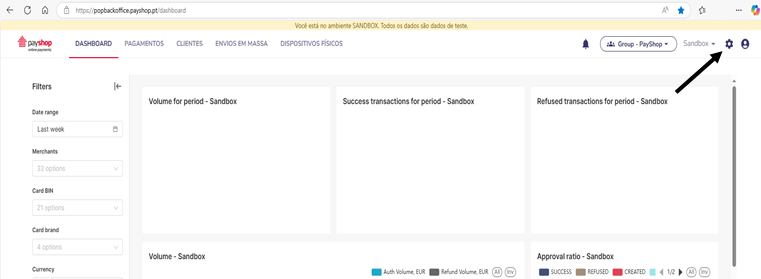
Clicking on Desarrolladores will display your credentials.
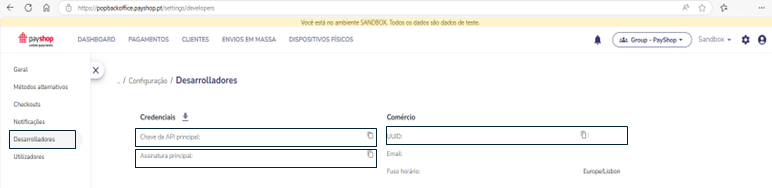
API key
profiles
The API key has
several profiles assigned to it that determine its permissions. Information
about the different API key
profiles and how to get them can be found in the API
Reference.
Payment methods
MB WAY
Using this
payment method, the user will receive a PUSH notification on his cell phone
that will allow him to make the payment through his bank's application. There
are two ways to integrate it: by redirection or push payment.
Integration by redirection
To integrate
by redirection, the user must be present at the time of payment, which must be
processed through a browser. First we must generate a payment order optionally
indicating the user's phone number so that the user does not have to fill it
in.
To obtain the
service identifier, the service_uuid of the
SIBS service, contact contato.pop@payshop.pt
Once the
order is generated, the user must be redirected to the payment screen indicating
the token of the order and in the query, the name of the APM:
We construct
the redirection URL by replacing the token of the order
returned from the previous call.
https://api.paylands.com/v1/sandbox/payment/process/{token}?apm=MBWAY
Once the user
is redirected to this screen, they will receive the notification on their cell
phone. When they complete the payment, they will be redirected back to the OK
or KO URL, depending on the result of the payment.
Push payment integration
If on the
other hand we do not want to require the user to be present at the time of
payment, this payment method can be integrated via push payment.
To do this,
we must first generate a payment order Mandatory with
the user's first name, last name and telephone number. If you do not have the
user's name and surname, you can send an empty string in these fields.

Next,
the push payment request must
be launched indicating the UUID of the order. Then the user will receive the
push notification on his cell phone, and once he completes the payment, the
merchant will receive the payment notification to the URL indicated in the
field `url_postundefined when generating the payment
order.
Multibanco is
an alternative payment method exclusive to Portugal that we offer through SIBS,
which allows payments to be made at an ATM or through the bank's mobile
application in which the user indicates the reference that they have obtained
during the payment process.
There are two
ways to integrate it: by redirection or push payment.
Integration via redirection
To integrate by
redirection, the user must be present at the time of payment, which must be
processed through a browser. First we must generate a payment order.
To obtain the
service identifier, the service_uuid of the
SIBS service, contact contato.pop@payshop.pt
Once the
order is generated, the user must be redirected to the payment screen indicating
the token of the order and in the query, the name of the APM:
We constructed the redirection URL by replacing
the token of the order returned from the previous call.

Once the user
is redirected to this screen, they will be able to view the reference to be
entered through his/her bank's mobile application or physically through an ATM.
When the payment is completed, they will be redirected back to the OK or
KO URL, depending on the result of the payment.
Push payment integration
If the merchant
prefers to send the reference to the user through a channel other than the
browser, it is possible to integrate the push payment method, which will return
the reference to the server so that it can be sent to the user.
To do this,
we must first generate a payment order.
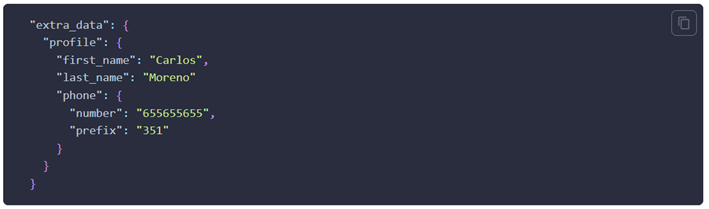
Then we must launch the push payment request indicating the UUID of the order. The response will contain the payment reference and payment deadline. These fields are included within the payment transaction, in the field payment_data. An example is included below:

Once the payment is completed, the merchant will
receive the payment notification to the URL indicated in the url_post field when generating the payment order.
Custom fields
By default,
there is no set deadline. If you want to customize this value, just add this
information when generating
the payment order with the desired date
in Y-m-d format:

Referência Payshop
Payshop is
an alternative payment method exclusive to Portugal which allows you to make
payments in more than 5000 authorized merchants. All you must do is enter the
13-digit reference number and hand over the cash to complete the purchase.
There are two
ways to integrate it: by redirection or push payment.
Integration by redirection
To integrate
by redirection, the user must be present at the time of payment, which must be
processed through a browser. First we must generate a payment order.
To
obtain the service identifier, the service_uuid of
the PAYSHOP service, contact contato.pop@payshop.pt
Once the order
is generated, the user must be redirected to the payment screen indicating
the token of the order and in the query, the name of the APM:
We construct the redirection URL by replacing
the token with the value returned in the previous call.

Once the user is redirected to this screen, he/she
will be able to view the reference. The reference could be paid in one of the
5000 Payshop Agents. When the payment is
completed, he/she will be redirected back to the OK or KO URL, depending on the
result of the payment.
Push payment integration
If the
merchant prefers to send the reference to the user through a channel other than
the browser, it is possible to integrate the push payment method, which will
return the reference to the server so that it can be sent to the user.
To do this,
we must first generate a payment order.
Then we must launch the push payment request indicating the UUID of the order. The response will contain the payment reference and payment deadline. These fields are included within the payment transaction, in the field payment_data. An example is included below:

Once the
payment is completed, the merchant will receive the payment notification to the
URL indicated in the `url_postundefined field when
generating the payment order.
Custom fields
By default, the expiration date is set within 3 days
from the moment the payment is triggered. If you want to customize this value,
just add the following information when generating the payment order indicating
with the desired date in Ymd format. Its
value must be equal to or greater than the current date:

You should specify the maximum number of payments that
can be made with the same reference by specifying the maxNbrPayments field.
Its value must be 1.
"extra_data":
{
"payment": {
"maxNbrPayments": "1"
}
}
Card (not present)
Simple integration
The
redirection payment card is the simplest and safest way to collect payments
from your customers. They are shown a screen with a form for them to enter
their card details. This can be done through a redirect or by showing them the
form embedded in a iframe on your
website.
1. Generate the payment order on your server
The merchant
must send the payment characteristics to the /payment endpoint
(amount, service, urls, ...) to generate the order.
Our API returns an order object together with an order TOKEN that will be used
to redirect to the payment letter to finalize the payment.
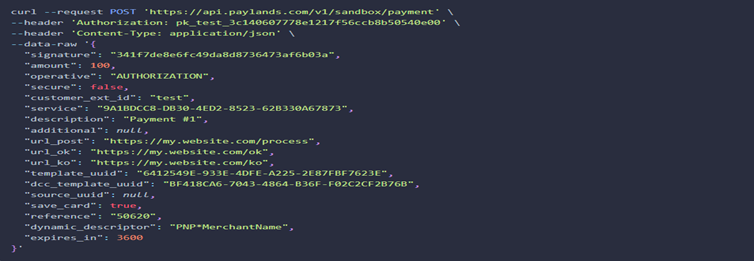
The complete
specification for Generate payment order can
be found in the API Reference.
2. Redirect the customer to the payment letter form.
In the
response of the previous call to /payment we have the TOKEN we need
to redirect the user to the payment letter form.

The URL of
the payment letter the merchant should redirect to
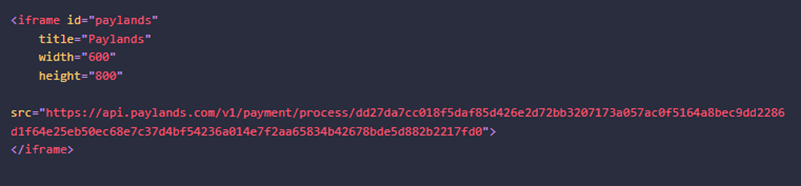
is /payment/process/{TOKEN} looking like this:

The merchant
can simply redirect the navigation to this URL or embed in an iframe the URL to simulate that the navigation continues on
your site.
3. The customer completes the payment and your server is
notified.
Customer
enters credit card information (and other payment information depending on the selected
payment method) and goes through the 3D secure verification process (is
redirected to the page provided by the credit card issuing bank for transaction
confirmation) if necessary.
Then Payshop receives the data, processes it and issues a
notification to the merchant at the url specified in
the url_post field along with the
updated order object with the result of the transaction.

4. The client is redirected back to your server
Then redirects the user to the corresponding url according to the result of the operation:
- If the payment was successful,
the user is redirected to the url specified in
the url_ok field.
- In any other case, the user is
redirected to the url specified in the url_ko field.
Payment notification
Example of a notification received
{
"message": "OK",
"code": 200,
"current_time":
"2022-11-16T11:16:33+0100",
"order": {
"uuid":
"D16004FF-3421-409C-ADFC-DA2618D36135",
"created": "2022-11-16T11:11:03+0100",
"created_from_client_timezone":
"2022-11-16T12:11:03+0200",
"amount": 1050,
"currency":
"978",
"paid": true,
"status":
"SUCCESS",
"safe": true,
"refunded": 0,
"additional":
"227610373340",
"service":
"CREDORAX",
"service_uuid":
"B1F13B01-BA97-491C-BBDE-1C18988BD229",
"customer":
"user42",
"cof_txnid":
"202232016000606",
"transactions": [
{
"uuid":
"2343BE77-1383-491E-8D95-5E00F0D35FAA",
"created": "2022-11-16T11:11:15+0100",
"created_from_client_timezone":
"2022-11-16T12:11:15+0200",
"operative": "AUTHORIZATION",
"amount": 1050,
"authorization": "651979",
"processor_id":
"XZZ01d4d229b0d5dB40RPKQCOSFNBGBH",
"status": "SUCCESS",
"error": "NONE",
"source": {
"object": "CARD",
"uuid": "F1E73ECB-D88C-4C57-919E-102F0E822416",
"type": "CREDIT",
"token": "95d37eaa18762d7d8c7b4ef098c4dd1e55450f21a9efaea27466d42da183b21b6cf3d0d8b74001b17ee3ba7d23e1daba7dda9b54a37979f3bb7cebc6e18ee7fe",
"brand": "VISA",
"country": "MT",
"holder": "Miguel C",
"bin": 401881,
"last4": "0036",
"is_saved": true,
"expire_month": "12",
"expire_year": "34",
"additional": null,
"bank": "BANK OF VALLETTA P.L.C",
"prepaid": false,
"validation_date": "2022-11-16
11:12:02",
"creation_date": "2022-11-16
11:11:51",
"brand_description": null,
"origin": "PAYMENT_CARD",
"cof": {
"is_available": true
}
},
"antifraud": null,
"device": {
"fingerprint": "495973560",
"user_agent": "Mozilla\/5.0 (X11;
Linux x86_64; rv:106.0) Gecko\/20100101 Firefox\/106.0"
},
"error_details": null,
"bizum": {
"account": "ES51XXXXXXXXXXXXXXXX0001",
"phone_number": "346XXXXX306"
}
}
],
"token": null,
"ip":
"127.0.0.1",
"reference": null,
"dynamic_descriptor":
null,
"threeds_data":
{
"version": "2.1",
"flow": "FRICTIONLESS",
"sca_requested": false,
"status": "Y",
"eci": "06",
"exemption": null
},
"dcc": {
"fee": "3.00 %",
"change": 0.099415,
"mode": "LOCAL",
"selection": "CARD",
"card_currency": "NOK",
"merchant_currency": "EUR",
"ecb_change": null
}
},
"client": {
"uuid":
"42B8CF56-A7D7-4D4A-8349-4E27263CB2D5"
},
"extra_data": {
"halcash":
{
"sender_name": "sender",
"secret_key": "1234",
"expiry_date": "2022-11-11"
}
},
"validation_hash":
"8fe27963c7dd6c134dfd09fca6e544942acf89a57c8488c6437ca9c355397250"
}
Whitelist IPS
Firstly, you
can whitelist the IPs coming from our servers. This is one of the most common
and simplest solutions.
To do so,
contact contato.pop@payshop.pt
to receive the IPs.
Validation using the hash of the notification
The other way
to check that the communication between Payshop and
the merchant is not being intercepted is by checking the validation hash. Once
the request to Payshop has been processed, a json response like the one below will be returned.
The extra_data field will only appear if it was included in the
initial request.

After
fetching the received json from the notification, we
must calculate a hash using the signature credential.
First of all,
we must extract the order, client and extra_data fields
from the received notification and store them in an array. Then we json encode this array and calculate the hash using the SHA
256 algorithm and the signature as described in the example below.
As mentioned
before, the extra_data field may not appear
if it was not sent in the initial request sent by the merchant.
Notifications of expired orders
To enable
this option you must contact contato.pop@payshop.pt and
request to enable Notify expired orders.
After
enabling this feature, whenever the order status is changed to expired, a
notification will be sent to the merchant to the url
specified in the url_post field along with
the updated order object:

The complete
specification for Generate payment order can
be found in the API Reference.